Chapter 23 Webpack Advanced
We’re about to cover slightly more advanced uses of NPM and webpack with R using packer. These involve using an NPM dependency to develop a widget and use Vue.js and Bootstrap 4 to power the front end of a Shiny application.
Those will make for more concrete cases to bring webpack into your workflow, and also enable explaining more advanced topics only thus far briefly touched upon, such as transpiling.
23.1 Widgets
The widget scaffold, like all other scaffolds, must be run from within the root of a package. To demonstrate we’ll write a widget for the countup library that allows animating numbers.
First, we create a package which we name counter. You can name the package differently but avoid naming it countup. We will later have to install the external dependency also named countup and NPM does not allow a project named X to use a dependency also named X.
From the root of the package, we scaffold the widget with scaffold_widget, which prints out some information on what packer exactly does.
── Scaffolding widget ──────────────────────────────── countup ──
✔ Bare widget setup
✔ Created srcjs directory
✔ Initialiased npm
✔ webpack, webpack-cli, webpack-merge installed with scope dev
✔ Created srcjs/config directory
✔ Created webpack config files
✔ Created srcjs/modules directory
✔ Created srcjs/widgets directory
✔ Created srcjs/index.js
✔ Moved bare widget to srcjs
✔ Added npm scripts

── Adding files to '.gitignore' and '.Rbuildignore' ──

✔ Setting active project to '/Projects/countup'
✔ Adding '^srcjs$' to '.Rbuildignore'
✔ Adding '^node_modules$' to '.Rbuildignore'
✔ Adding '^package\\.json$' to '.Rbuildignore'
✔ Adding '^package-lock\\.json$' to '.Rbuildignore'
✔ Adding '^webpack\\.dev\\.js$' to '.Rbuildignore'
✔ Adding '^webpack\\.prod\\.js$' to '.Rbuildignore'
✔ Adding '^webpack\\.common\\.js$' to '.Rbuildignore'
✔ Adding 'node_modules' to '.gitignore'

── Adding packages to Imports ──

✔ Adding 'htmlwidgets' to Imports field in DESCRIPTION
● Refer to functions with `htmlwidgets::fun()`

── Scaffold built ──

ℹ Run `bundle` to build the JavaScript files
Importantly, it runs htmlwidgets::scaffoldWidget internally, there is thus no need to run this function. About the widget itself, there is very little difference between what htmlwidgets::scaffoldWidget and packer::scaffold_widget. While, if you remember, the initial scaffold of htmlwidgets includes a simple function to display a message in HTML using innerText. The scaffold produced by packer differs only in that this message is displayed in <h1> HTML tags. That is so it can, from the get-go, demonstrate how to modularise a widget. We’ll cover that in just a minute, before we do so, bundle the JavaScript and run the counter function to observe the output it generates.
This indeed displays the message in <h1> HTML tags, now onto unpacking the structure generated by packer. We’ll skip the R code to keep this concise as nothing differs from a standard widget on that side. Instead, we’ll focus on the JavaScript code in the srcjs directory. First, in the srcjs/widgets directory, one will find the file countup.js. This file contains the code that produces the widget.
At the top of the file are the imports. First, it imports widgets, which is the htmlwidgets external dependency, second it imports the function asHeader from the header.js file in the modules directory.
import 'widgets';
import { asHeader } from '../modules/header.js';

HTMLWidgets.widget({

  name: 'countup',

  type: 'output',

  factory: function(el, width, height) {

    // TODO: define shared variables for this instance

    return {

      renderValue: function(x) {

        // TODO: code to render the widget, e.g.
        el.innerHTML = asHeader(x);

      },

      resize: function(width, height) {

        // TODO: code to re-render the widget with a new size

      }

    };
  }
});
The header.js file includes the asHeader function, which accepts an x argument that is used to create the <h1> message. This function is exported.
We will make changes to the JavaScript so that instead of displaying the message as text, it uses the aforementioned countup library to animate a number. The first order of business is to install countup. Here we use packer to do so; the function call below is identical to running npm install countup --save from the terminal.
We will not need the header.js file. We can delete it and in its stead create another file called count.js. This file will include a function that uses countup to animate the numbers. It should accept 1) the id of the element where countup should be used, and 2) the value that countup should animate. This function called counter is, at the end of the file, exported.
import { CountUp } from 'countup.js';

function counter(id, value){
  var countUp = new CountUp(id, value);
  countUp.start();
}

export { counter };
We need to add the import statement to bring in the counter function and run it in the renderValue method. Packer also added the htmlwidgets external dependency, which is imported below with import 'widgets'.
Because we left the R function countup untouched, we have to use the default message variable it accepts. Ideally, this argument in the R function should be renamed to something more adequate.
import 'widgets';
import { counter } from '../modules/count.js';

HTMLWidgets.widget({

  name: 'countup',

  type: 'output',

  factory: function(el, width, height) {

    // TODO: define shared variables for this instance

    return {

      renderValue: function(x) {

        counter(el.id, x.message);

      },

      resize: function(width, height) {

        // TODO: code to re-render the widget with a new size

      }

    };
  }
});
Finally, the JavaScript bundle can be generated with packer::bundle(), install the package or run devtools::load_all(), and test that the widget works!
That hopefully is a compelling example to use NPM and webpack to build widgets. It could even be argued that it is easier to set up; dependencies are much more manageable; nothing has to be manually downloaded; it will be easier to update them in the future, etc.
23.2 Shiny with Vue and Bootstrap 4
In this example, we create a Shiny application that uses Vue.js and Bootstrap 4 in the front end. As you may know, Shiny ships with Bootstrap version 3, not 4 (the latest at the time of writing this).
23.2.1 Setup
If you prefer using React, know that it is also supported by webpack and packer. Vue is a framework to create user interfaces that, like React, make much of the front end work much more straightforward. It reduces the amount of code one has to write, simplifies business logic, enables reactivity, and much more.
Since packer only allows placing scaffolds in R packages, the way one can build Shiny applications is using the golem package. Golem is an opinionated framework to build applications as R packages. Writing Shiny applications as R packages brings many of the advantages that packages have to Shiny applications: ease of installation, unit testing, dependency management, etc.
After installing golem from CRAN, we can create an application with the golem::create_golem function; it’s very similar to usethis::create_package, only it prepares a package specifically to build Shiny applications.
From within a golem application, one uses a scaffold specifically designed for this with scaffold_golem. Note that this does not mean other scaffolds will not work, custom Shiny inputs and outputs can also be created with scaffold_input and scaffold_output, respectively. The scaffold_golem function takes two core arguments; vue and react. Setting either of these to TRUE will prepare a scaffold specifically designed to support either Vue or React.
The reason these arguments exist is that webpack requires further configuration that can be tricky to set up manually. Moreover, Vue supports (but does not require) .vue files; these can hold HTML, JavaScript, and CSS. One can think of such files as similar to Shiny modules; they encapsulate a part of the logic of the application for easy modularisation.
When the vue argument is set to TRUE in scaffold_golem, the function does follow the usual procedure or initialising NPM, creating the various files, and directories, but in addition configures two loaders and the vue plugin.
Loaders are transformers, they scan files in the srcjs directory and pre-process them. That allows using, for instance, the Babel compiler that will transform the latest version of JavaScript into code that every browser can run. This compiler is very often used, including here, to compile Vue code. Since Vue allows placing CSS in .vue files, another loader is required; one that will look for CSS and bundle it within the JavaScript file.
Plugins are a feature of webpack that allow extending its functionalities; there is one for Vue, which the function will install and configure for you.
Also, when creating a scaffold for vue or react, one can choose whether to rely on the CDN, in which case they are installed as developer dependencies, or install them for production, in which case they are included in the bundle. It defaults to using the CDN; this is often advised as the CDN will serve the required files faster.
The scaffold also sets up webpack with Babel, the transpiler that allows writing the latest JavaScript, and ensures it will run on (almost) any web browser. Hence, we can use ES6 notation in places.
── Scaffolding golem ──────────────────────────────────────────
✔ Initialiased npm
✔ webpack, webpack-cli, webpack-merge installed with scope dev
✔ Added npm scripts
✔ Created srcjs directory
✔ Created srcjs/config directory
✔ Created webpack config files

── Adding files to '.gitignore' and '.Rbuildignore' ──

✔ Setting active project to '/Projects/vuer'
✔ Adding '^srcjs$' to '.Rbuildignore'
✔ Adding '^node_modules$' to '.Rbuildignore'
✔ Adding '^package\\.json$' to '.Rbuildignore'
✔ Adding '^package-lock\\.json$' to '.Rbuildignore'
✔ Adding '^webpack\\.dev\\.js$' to '.Rbuildignore'
✔ Adding '^webpack\\.prod\\.js$' to '.Rbuildignore'
✔ Adding '^webpack\\.common\\.js$' to '.Rbuildignore'
✔ Adding 'node_modules' to '.gitignore'

── Vue loader, plugin & dependency ──

✔ babel-loader installed with scope dev
✔ Added loader rule for 'babel-loader'
✔ @babel/core, @babel/preset-env installed with scope dev
✔ vue installed with scope dev
✔ vue-loader, vue-template-compiler installed with scope dev
✔ Added loader rule for 'vue-loader' and 'vue-template-compiler'
✔ style-loader, css-loader installed with scope dev
✔ Added loader rule for 'style-loader' and 'css-loader'
✔ Created R/vue_cdn.R containing `vueCDN()` function
✔ Added alias to srcjs/config/misc.json

── Babel config file ──

✔ Created '.babelrc'
✔ Adding '^\\.babelrc$' to '.Rbuildignore'

── Template files ──

✔ Added srcjs/Home.vue template
! Place the following in your shiny ui:
tagList(
  vueCDN(),
  div(id = "app"),
  tags$script(src = "www/index.js")
)

── Scaffold built ──

ℹ Run `bundle` to build the JavaScript files
Note the first instruction that was printed in the console; it states a tagList must be placed in the Shiny UI of the application. It imports the Vue dependency via the CDN with vueCDN(), which is a function created by packer, creates a <DIV> with an id attribute of app that will be used as root of the Vue application; where the application generated by Vue will be placed. It also imports the bundled JavaScript (index.js). So let us place that in the Shiny UI, which is in the R/app_ui.R file.
app_ui <- function(request) {
  tagList(
    golem_add_external_resources(),
    fluidPage(
      tagList(
        vueCDN(),
        div(id = "app"),
        tags$script(src = "www/index.js")
      )
    )
  )
}
To ensure all is correct up to this point we can test the application; the JavaScript can be bundled with packer::bundle() then the app tested by running run_app().
23.2.2 Bootstrap 4 Installation
Next, we can install Bootstrap 4; we’ll use bootstrap-vue which contains a lot of Bootstrap 4 components for Vue. We won’t be using any CDN here, so we install those dependencies as production.
This will cause some issues though, as the Shiny application will have two different versions of Bootstrap, the default version 3 and version 4 from the bundle. We need to remove Bootstrap 3.
23.2.3 Vue Code
Let us now explore the contents of srcjs and code a basic functionality. It’s relatively straightforward; it consists of two files. The first, index.js, creates the Vue application and places it in the div(id = "app"). The code for the app itself is in a .vue file, which it imports with import App from "./Home.vue";.
import Vue from "vue";
import App from "./Home.vue";

new Vue({
  el: "#app",
  template: "<App/>",
  components: { App }
});
The first order of business is to import the Bootstrap dependencies that were installed and “use” them in the application. We don’t explain this in great detail here as much of it is specific to Vue and is thus outside the scope of this book.
import Vue from "vue";
import { BootstrapVue, IconsPlugin } from 'bootstrap-vue'
// import dependencies
import 'bootstrap/dist/css/bootstrap.css'
import 'bootstrap-vue/dist/bootstrap-vue.css'
import App from "./Home.vue";

// attach dependencies
Vue.use(BootstrapVue)
Vue.use(IconsPlugin)

new Vue({
  el: "#app",
  template: "<App/>",
  components: { App }
});
The Home.vue file is where the meat of the application is placed. By default, packer creates an app that just displays a message.
<template>
  <p>{{ greeting }} powered by Vue!</p>
</template>

<script>
module.exports = {
  data: function() {
    return {
      greeting: "Shiny"
    };
  }
};
</script>

<style scoped>
p {
  font-size: 2em;
  text-align: center;
}
</style>
Below we make changes to the application, so it features a Boostrap 4 text input. After having entered some text and hitting enter the text entered is displayed below and cleared from the input. We also provide a button that sends the input data to the R server.
<template>
  <div>
    <b-form-input
      v-model="inputText"
      placeholder="Enter your name"
      @keyup.enter="processText">
    </b-form-input>
    <b-button
      @click="processText"
      variant="outline-primary">
      Button
    </b-button>
    <h2>Your name is {{ text }}</h2>
  </div>
</template>

<script>
module.exports = {
  data: function() {
    return {
      text: '',
      inputText: ''
    };
  },
  methods: {
    processText: function(){
      this.text = this.inputText // set text var
      Shiny.setInputValue('text', this.text);
      this.inputText = '' // remove input once entered
    }
  }
};
</script>
Finally, we can bundle the JavaScript, and run the application to obtain Figure 23.1.
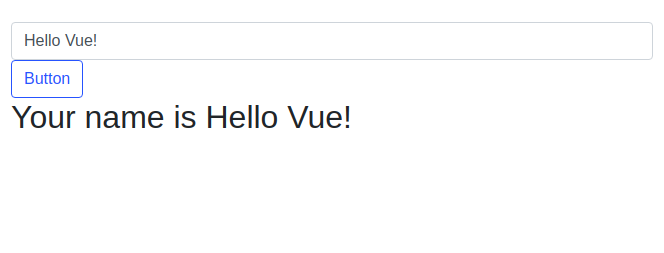
FIGURE 23.1: Shiny application with Vue and Bootstrap 4
Note how little code was written in order to provide these functionalities. It is one of the most powerful features of frameworks like Vue and React. They are not necessary; this could have been coded in vanilla JavaScript, but would admittedly require much more (difficult to read) code.