Chapter 14 Custom Outputs
In this chapter, we create a custom Shiny output; in practical terms, this creates custom render* and *Output functions to use in Shiny. This will be demonstrated by creating something akin to the valueBox available in the shinydashboard (Chang and Borges Ribeiro 2018) package. While similar to what shinydashboard provides, this box will 1) be fully customisable and 2) available in any Shiny application 3) have additional functionalities.
The valueBox equivalent we shall build in this chapter is named “boxxy,” and allows creating simple but colourful value boxes with animated numbers (by counting up to it) using countUp.js.
Figure 14.1 demonstrates what will be built in this chapter.
library(shiny)

ui <- fluidPage(
  boxxyOutput("countries")
)

server <- function(input, output){
  output$countries <- renderBoxxy({
    boxxy("Countries", 95)
  })
}

shinyApp(ui, server)
FIGURE 14.1: Custom output example
14.1 Inner-workings
At the core, this consists in creating three functions: boxxy, renderBoxxy, and boxxyOutput (analogous to plot, renderPlot, plotOutput), which are linked by an “output binding” in JavaScript.
The first function, boxxy will accept arguments that help define what is in the box. This function is generally useful to preprocess any of the arguments that are meant to produce the custom output. The boxxyOutput function essentially creates the scaffold of the HTML output (e.g.: <div>), as well as the dependencies. The render* function is perhaps more peculiar: it should accept an expression and return a function.
Previous work with Shiny and JavaScript covered in this book had no dedicated “output” elements that were placed in the Shiny UI. Therefore, one had to use a function solely dedicated to importing the dependencies (e.g.: usejBox). However, since this is not the case here, the dependencies can be attached together with the output.
Finally, the two R functions are “bound” JavaScript-side with an “output binding” that renders the data from the render* function with its *output.
14.2 Setup
The custom output will be part of a Shiny application, let us thus create the basic skeleton of an application and download the dependencies. Create a project in RStudio or an empty directory, then:
- Create an
app.Rfile that will hold the code for the application andboxxy,boxxyOutput, andrenderBoxxyfunctions. - Create an
assetsdirectory that will contain the CSS and JavaScript files. - Download the countUp.js dependency.
- Create a
binding.jsJavaScript file for the JavaScript binding within the previously createdassetsdirectory. - Create a
styles.cssfile in theassetsdirectory.
# application file
file.create("app.R")

# static file directory
dir.create("assets")

# countup dependency
url <- paste0(
  "https://cdn.jsdelivr.net/npm/",
  "countup@1.8.2/countUp.js"
)

download.file(url, "assets/countup.js")

# create binding file
file.create("assets/binding.js")

# CSS file
file.create("assets/styles.css")
This should produce the following directory structure.
.
├── app.R
└── assets
    ├── binding.js
    ├── countup.js
    └── styles.css
14.3 Output R Function
The boxxy function takes three arguments: a title, a value that will be animated, and the background color to use for the box. The function, at this stage at least, does not preprocess the arguments and returns them as a named list.
14.4 Generate Output HTML
The boxxyOutput function, like all such functions (plotOutput, uiOutput, etc.) takes an id. This function should return an HTML tag that bears an id, or a data-input-id attribute (more on that later) and a class. The id is to be defined by the user of the function in Shiny just like any other such outputs. For instance, plotOutput creates a <div>, the id of which is actually the id used in the plotOutput function.
The class is used JavaScript-side to “find” the outputs in the DOM and generate the output. The function boxxyOutput could thus be as shown, the id is passed along to the <div>, which is created with a boxxy class that will be used in the output binding to find that element and generate the output within that very <div> using data that will be passed from the server.
Make sure you use unique class names so they are not accidentally overridden by the user.
As shown, the box should include a title and an animated value. These could be generated entirely in JavaScript, but it’s actually easier to create placeholders with htmltools tags. We generate dynamic ids for those so they can easily be referenced later on in JavaScript: id-boxxy-value for the value and id-boxxy-title for the title.
boxxyOutput <- function(id){
  # the HTML output
  shiny::tags$div(
    id = id, class = "boxxy",
    h1(
      id = sprintf("%s-boxxy-value", id),
      class = "boxxy-value"
    ),
    p(
      id = sprintf("%s-boxxy-title", id),
      class = "boxxy-title"
    )
  )
}
Finally, we also used classes in the output so every element it comprises can be styled with ease.
.boxxy{
  text-align: center;
  border-left: 6px solid #073b4c;
  padding: 1em;
}

.boxxy-title{
  text-transform: uppercase;
}

.boxxy-value{
  font-size: 3em;
}
In some previous examples we created a function decicated to importing dependencies in the Shiny UI but in this case they can piggyback on the boxxyOutput function. This works using the htmltools package. The function htmltools::htmlDependency is used to create a dependency that is then attached with htmltools::attachDependencies. While the former creates an object that Shiny can understand and translate into <script> or <style> tags, the former attaches them to the output object and ensures dependencies are not imported multiple times (e.g.: when boxxyOutput is used more than once).
Notice the use of normalizePath to retrieve the full path to the assets directory as this will not work with a relative path (e.g.: ./assets). The dependencies consist of the three files previously created and necessary to generate the output: countup.js, the dependency that was downloaded, as well as binding.js and styles.css.
boxxyOutput <- function(id){
  el <- tags$div(
    id = id, class = "boxxy",
    h1(
      id = sprintf("%s-boxxy-counter", id),
      class = "boxxy-value"
    ),
    p(
      id = sprintf("%s-boxxy-title", id),
      class = "boxxy-title"
    )
  )

  # get full path
  path <- normalizePath("assets")

  deps <- list(
    htmltools::htmlDependency(
      name = "boxxy",
      version = "1.0.0",
      src = c(file = path),
      script = c("countup.js", "binding.js"),
      stylesheet = "styles.css"
    )
  )

  htmltools::attachDependencies(el, deps)
}
Running the function reveals the HTML it generates at the exception of the dependencies which htmltools does not print to the console.
14.5 Output Renderer
The function renderBoxxy should accept an expression, like other such render* functions. For instance, in the example below the renderPlot function does accept an expression that uses, amongst other functions, plot.
The function renderBoxxy takes an expression and other arguments that are passed to shiny::exprToFunction. This does pretty much what it says on the tin: it returns a function from an expression (unless that expression is a function, in which case it returns the expression). This function must be further wrapped in another as render functions must return functions.
14.6 JavaScript Output Binding
Here we create an “output binding.” It tells Shiny how to find the component and how to interact with it. An output binding is initialised from Shiny.OutputBinding. Below we initialise a new binding.
Then, this must be “extended” by specifying a number of methods, an essential one being find. It is used to look for the output HTML element in the document (scope), and to return them as an array (HTMLcollection). Other methods all take an el argument; that value will always be an element that was returned from find. A very straightforward way to accomplish this is to use jQuery’s find method to identify elements with the boxxy class used in boxxyOutput. You are by no means forced to use a CSS class to identify the elements, but there is no reason not to.
// custom.js
var boxxyBinding = new Shiny.OutputBinding();
$.extend(boxxyBinding, {
find: function(scope) {
return $(scope).find(".boxxy");
}
});One might then want to use the getId method, which returns the id of the element, by default, as can be seen in the source code (below), the binding returns the id as the data-input-id attribute, and if that is false it returns the element’s id.
Since boxxy uses the element id, the default will work, and this can be skipped entirely.
Next, one needs to implement the renderValue function, which is the same function that generates the output based on data used in boxxy and sent to the front end with renderBoxxy. The renderValue method accepts two arguments: first el, the element where the output should be generated; this is effectively the output of boxxyOutput, which the binding found using find. The second argument is data which is the data, passed to boxxy and serialised via renderBoxxy.
The renderValue is in effect very similar if not identical to the JavaScript function of the same name involved in creating htmlwidgets.
14.6.1 Boxxy Title
Let us now tackle the first of the three core aspects of the boxxy output: the title. The title should be placed in the previously-created placeholder which bears the id-boxxy-title, precisely as was done with htmlwidgets previously. We insert title (data.title) in the element with innerText. The dynamically generated id for the title is built in the same way it is in R, by concatenating the id with -boxxy-title
- In R
sprintf("%s-boxxy-title", id) - In JavaScript
el.id + '-boxxy-title'
14.6.2 Boxxy Value
Though the custom output could be limited to a static value generated in a fashion similar to how the title is placed, we opted for a more fancy animated value using countUp.js.
Initialise a new counter, specify the id of the element, where it should be created as first argument, as second argument the starting value from which the counter should start, and finally the value to count up to. Note that there is a fourth argument to pass a JSON of options, which we do not use here.
// place counter in elementId
// start at 0 and count up to 123
const counter = new CountUp('elementId', 0, 123);
counter.start();The counter has to be generated in the <h1> placeholder bearing the id-boxxy-value, while the value to count up to is stored in data.value meaning the counter can be initialised with new CountUp(el.id + '-boxxy-value', 0, data.value);.
var boxxyBinding = new Shiny.OutputBinding();
$.extend(boxxyBinding, {
find: function(scope) {
return $(scope).find(".boxxy");
},
renderValue: function(el, data) {
// insert the title
let title_id = el.id + '-boxxy-title';
document.getElementById(title_id).innerText = data.title
// counter start at 0
let counter_id = el.id + '-boxxy-value';
var counter = new CountUp(counter_id, 0, data.value);
counter.start();
}
});14.6.3 Boxxy Background Color
Then we can set the background colour that was passed to boxxy (data.color).
var boxxyBinding = new Shiny.OutputBinding();
$.extend(boxxyBinding, {
find: function(scope) {
return $(scope).find(".boxxy");
},
renderValue: function(el, data) {
// insert the title
let title_id = el.id + '-boxxy-title';
document.getElementById(title_id).innerText = data.title
// counter start at 0
let counter_id = el.id + '-boxxy-value';
var counter = new CountUp(counter_id, 0, data.value);
counter.start();
// background color
el.style.backgroundColor = data.color;
}
});14.6.4 Register the Output Binding
Finally, the output binding must be registered with Shiny. Note that it uses a unique string identifier. The documentation states:
At the moment it is unused but future features may depend on it.
var boxxyBinding = new Shiny.OutputBinding();
$.extend(boxxyBinding, {
find: function(scope) {
return $(scope).find(".boxxy");
},
renderValue: function(el, data) {
// insert the title
let title_id = el.id + '-boxxy-title';
document.getElementById(title_id).innerText = data.title
// counter start at 0
let counter_id = el.id + '-boxxy-value';
var counter = new CountUp(counter_id, 0, data.value);
counter.start();
// background color
el.style.backgroundColor = data.color;
}
});
// register
Shiny.outputBindings.register(boxxyBinding, "john.boxxy");Ensure that string uniquely identifies the binding to avoid future clash with other such bindings.
14.7 Boxxy Usage
With all of this in place, one can use boxxy in a Shiny application (Figure 14.2).
library(shiny)
boxxy <- function(title, value, color = "black"){
list(title = title, value = value, color = color)
}
boxxyOutput <- function(id){
el <- shiny::tags$div(
id = id, class = "boxxy",
h1(id = sprintf("%s-boxxy-value", id), class = "boxxy-value"),
p(id = sprintf("%s-boxxy-title", id), class = "boxxy-title")
)
path <- normalizePath("assets")
deps <- list(
htmltools::htmlDependency(
name = "boxxy",
version = "1.0.0",
src = c(file = path),
script = c("countup.js", "binding.js"),
stylesheet = "styles.css"
)
)
htmltools::attachDependencies(el, deps)
}
renderBoxxy <- function(expr, env = parent.frame(),
  quoted = FALSE) {
  # Convert the expression + environment into a function
  func <- shiny::exprToFunction(expr, env, quoted)

  function(){
    func()
  }
}
ui <- fluidPage(
h2("Custom outputs"),
fluidRow(
column(
3, boxxyOutput("countries")
),
column(
3, boxxyOutput("employees")
),
column(
3, boxxyOutput("customers")
),
column(
3, boxxyOutput("subs")
)
)
)
server <- function(input, output){
output$countries <- renderBoxxy({
boxxy("Countries", 95, color = "#ef476f")
})
output$employees <- renderBoxxy({
boxxy("Thing", 650, color = "#06d6a0")
})
output$customers <- renderBoxxy({
boxxy("Customers", 13592, color = "#118ab2")
})
output$subs <- renderBoxxy({
boxxy("Subscriptions", 16719, color = "#ffd166")
})
}
shinyApp(ui, server)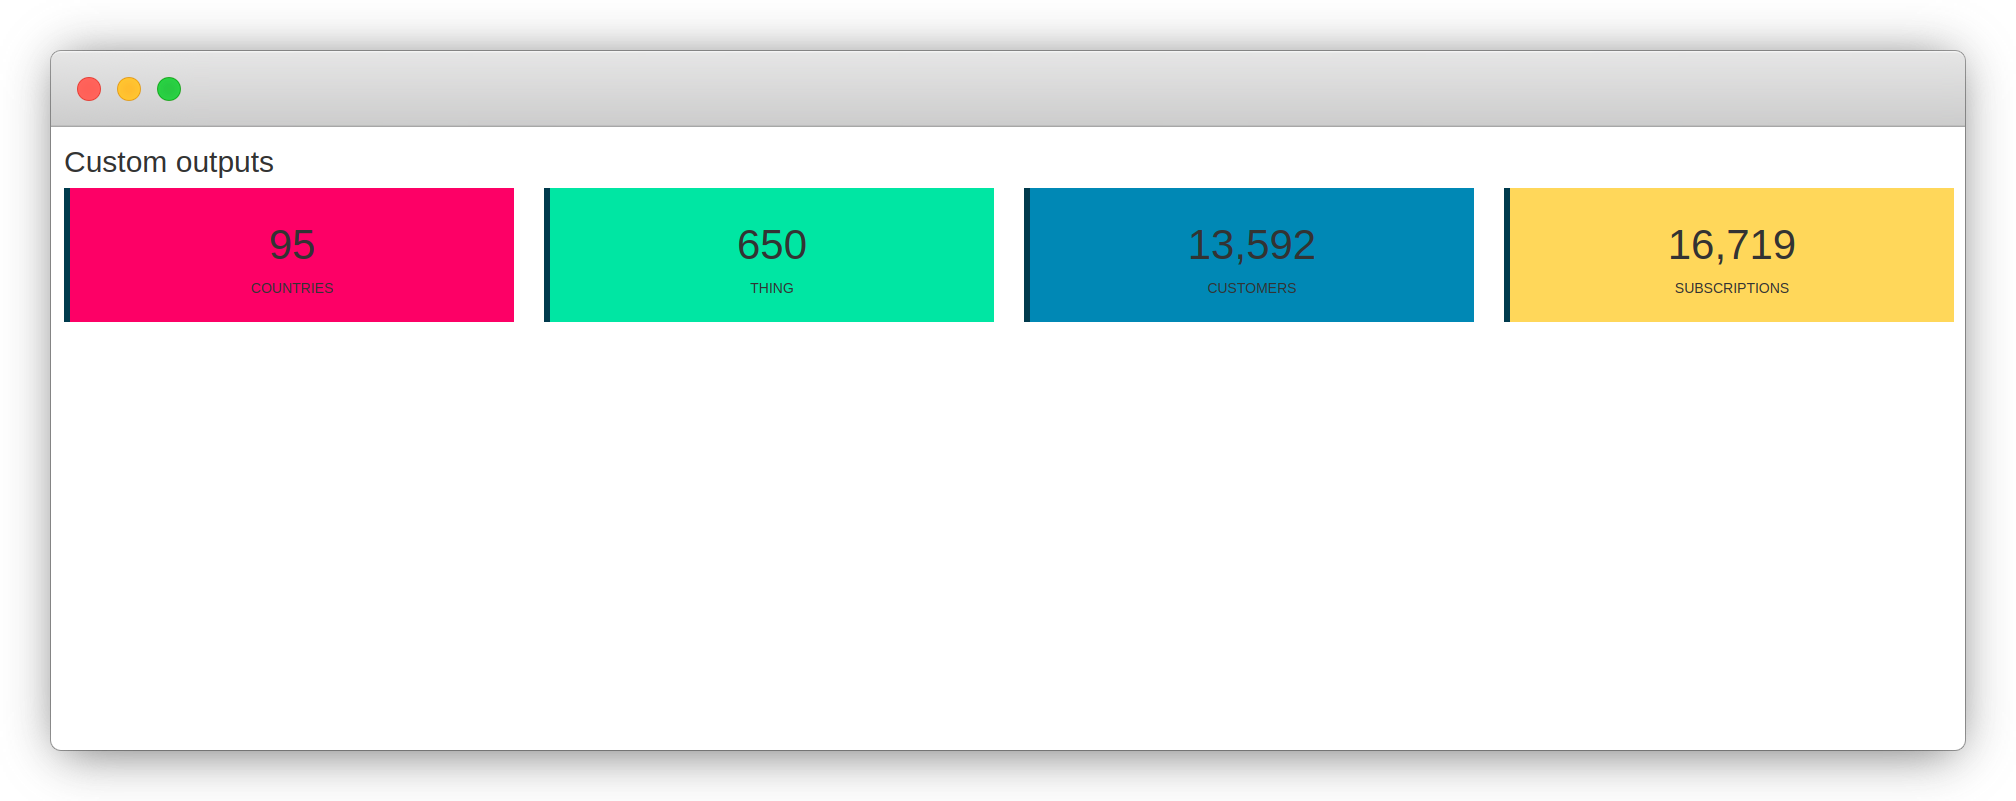
FIGURE 14.2: Shiny application with boxxy
14.8 Injecting Dependencies
We could consider making the animation of the value rendered with boxxy optional; some users may not want to use it. You might already imagine how a new argument and a few if-statements could very quickly do the job, but how would one handle the dependency? Indeed if users do not want to make use of the animation, the CountUp.js dependency should also be excluded so as to keep the output as light as possible.
The dependency is currently attached in the boxxyOutput function, which does not take any argument. It could, but it would make for the rather messy and confusing interface as whatever additional argument that indicates whether the numbers should be animated would have to be specified twice. Once in the boxxyOutput function, so it does not import the dependency, as well as in the boxxy function in order to serialise that parameter, so the JavaScript binding does not run the animation function.
# pseudo code
# do not do this
library(shiny)

ui <- fluidPage(
  boxxyOutput(
    "countries",
    # do not import dependency
    animate = FALSE
  )
)

server <- function(input, output){
  output$countries <- renderBoxxy({
    # do not animate the numbers
    boxxy("Countries", 95, animate = FALSE)
  })
}

shinyApp(ui, server)
Thankfully there is a better way, combining htmltools and Shiny to insert the dependency dynamically from JavaScript.
The boxxy function needs to take an additional argument animate, which is passed to the output list. This will be used in the render function (and JavaScript binding) to render the dependency dynamically.
boxxy <- function(title, value, color = "black", animate = TRUE){
  list(
    title = title, value = value, color = color, animate = animate
  )
}
The boxxyOutput function can be slightly simplified. It currently attaches the countup.js dependency, which needs to be removed.
boxxyOutput <- function(id){
  el <- shiny::tags$div(
    id = id, class = "boxxy",
    h1(id = sprintf("%s-boxxy-value", id), class = "boxxy-value"),
    p(id = sprintf("%s-boxxy-title", id), class = "boxxy-title")
  )

  path <- normalizePath("assets")

  # only attach binding.js
  deps <- list(
    htmltools::htmlDependency(
      name = "boxxy",
      version = "1.0.0",
      src = c(file = path),
      script = c("binding.js"),
      stylesheet = "styles.css"
    )
  )

  htmltools::attachDependencies(el, deps)
}
The renderBoxxy function sees some modifications, while before it was technically only returning a function that itself returned the output of boxxy (func() == boxxy()). Here we want to capture the output of boxxy to check whether the animate element is TRUE and, if so, add the dependency.
renderBoxxy <- function(expr, env = parent.frame(),
  quoted = FALSE) {
  # Convert the expression + environment into a function
  func <- shiny::exprToFunction(expr, env, quoted)

  function(){
    val <- func()

    if(val$animate){
      # add dependency
    }

    return(val)
  }
}
Within the if statement, the dependency can be created with the htmltools as done for the binding. Ensure the names of the dependencies are unique as shiny internally uses it to differentiate between them; if they bear the same name Shiny assumes they are the same and will only render one of them.
Make sure dependencies bear different names or Shiny thinks it’s the same and only renders one of them.
The dependency generated with htmltools is then passed to the shiny::createWebDependency function, which internally uses shiny::addResourcePath to serve the dependency. This is necessary here as, at this stage, the countup dependency is not actually rendered; below we merely add it to the list of options that serialised to JSON. Indeed, this will actually be injected JavaScript-side. Therefore the front end needs to be able to access this file, hence it is served.
renderBoxxy <- function(expr, env = parent.frame(),
  quoted = FALSE) {
  # Convert the expression + environment into a function
  func <- shiny::exprToFunction(expr, env, quoted)

  function(){
    # evaluate to output list
    val <- func()

    # add dependency
    if(val$animate){
      path <- normalizePath("assets")

      deps <- htmltools::htmlDependency(
        name = "countup", # change name
        version = "1.8.2",
        src = c(file = path),
        script = c("countup.js") # only countup
      )

      # serve dependency
      val$deps <- list(shiny::createWebDependency(deps))
    }

    return(val)
  }
}
Thus far, the dependency is dynamically included in the R object; that is serialised to JSON, but it is not yet actually imported in the document—this happens in the JavaScript binding.
The first thing we ought to do is mirror the if-statement that was created in the renderBoxxy function. If the numbers should be animated, the function can use countup; if not, it must insert the text with insertText just like it does for the title.
var boxxyBinding = new Shiny.OutputBinding();

$.extend(boxxyBinding, {
  find: function(scope) {
    return $(scope).find(".boxxy");
  },
  renderValue: function(el, data) {

    let boxValue, boxTitle;

    el.style.backgroundColor = data.color;

    if(data.animate){
      var counter = new CountUp(
        el.id + '-boxxy-value', 0, data.value
      );
      counter.start();
    } else {
      boxValue = document.getElementById(el.id + '-boxxy-value')
      boxValue.innerText = data.value;
    }

    boxTitle = document.getElementById(el.id + '-boxxy-title')
    boxTitle.innerText = data.title;
  }
});

Shiny.outputBindings.register(boxxyBinding, "john.boxxy");
Finally, we can render the dependency. The JavaScript method aptly named renderDependencies will do just that from the list of dependency created in renderBoxxy.
var boxxyBinding = new Shiny.OutputBinding();

$.extend(boxxyBinding, {
  find: function(scope) {
    return $(scope).find(".boxxy");
  },
  renderValue: function(el, data) {

    let boxValue, boxTitle;

    el.style.backgroundColor = data.color;

    if(data.animate){
      Shiny.renderDependencies(data.deps); // render dependency
      var counter = new CountUp(
        el.id + '-boxxy-value', 0, data.value
      );
      counter.start();
    } else {
      boxValue = document.getElementById(el.id + '-boxxy-value')
      boxValue.innerText = data.value;
    }

    boxTitle = document.getElementById(el.id + '-boxxy-title')
    boxTitle.innerText = data.title;
  }
});

Shiny.outputBindings.register(boxxyBinding, "john.boxxy");
With those changes made, not only is the animation of numbers optional, but if users decide to turn off the animation in all boxxy functions, the countup.js file will not be included at all.
library(shiny)

ui <- fluidPage(
  h2("Custom outputs"),
  fluidRow(
    column(
      3, boxxyOutput("countries")
    ),
    column(
      3, boxxyOutput("employees")
    )
  )
)

server <- function(input, output){
  output$countries <- renderBoxxy({
    boxxy("Countries", 176, animate = FALSE)
  })

  output$employees <- renderBoxxy({
    boxxy("Thing", 67, animate = FALSE)
  })
}

shinyApp(ui, server)
14.9 Preprocessing Custom Outputs
One aspect that this example did not truly explore thus far is the idea that the function boxxy should preprocess the input more in order to be truly justified. Currently boxxy only wraps the arguments in a list. Therefore, the code below works too.
# works too
output$theId <- renderBoxxy({
  list(
    title = "The Title",
    value = 123,
    color = "blue",
    animate = TRUE
  )
})
One the things boxxy could do is preprocess the input for instance. Instead of accepting a vector of length one for the value argument, it takes the sum of it to allow vectors of any length and dynamically changes the color depending on value.
boxxy <- function(title, value, color = NULL, animate = TRUE){

  # sum the vector
  value <- sum(value)

  # dynamic color
  if(is.null(color))
    if(value > 100)
      color <- "#ef476f"
    else
      color <- "#06d6a0"

  list(
    title = title,
    value = value,
    color = color,
    animate = animate
  )
}
This means boxxy could be used like so: boxxy("Total", c(1,6,9)).
References
Chang, Winston, and Barbara Borges Ribeiro. 2018. Shinydashboard: Create Dashboards with ’Shiny’. https://CRAN.R-project.org/package=shinydashboard.