Chapter 12 A Complete Integration
Thus far, this part of the book has covered both ways data travels between JavaScript and R in Shiny. However, the notices displayed in the previous chapter, though they demonstrate how both languages can work together within Shiny, come short of illustrating some more advanced use cases, how to package such code and more.
We shall introduce a fascinating JavaScript library that enables running machine learning models in web browsers: ml5.js. The library is a high-level interface to tensorflow.js but very extensive as it includes a multitude of models to deal with sound, image, text, and more. In this chapter, one of those models is implemented, an image classifier using mobileNet but the method shown can be used to integrate any other model later on.
This is not a gimmick; running a model this way means it runs in the client (web browsers) and not on the Shiny server, leaving it free to compute anything else and serve other concurrent users. It’s also fast; JavaScript is often wrongly believed to be slow, on the contrary. Finally, the JavaScript API provided is straightforward; it’s impressive how ml5.js exposes complex models through such a simple API.
For those who may already know TensorFlow and want to use a lower-level library, the genius of tensorflow.js is that it runs on WebGL and is therefore GPU-accelerated; i.e., it’s not slow, and has a very similar API to the TensorFlow Python library.
We start by exploring ml5.js, then plan the Shiny application that will make use of it, and finally, we wrap our work in the form of an R package.
12.1 Discover
As for all projects that involve external libraries, the very first thing to do is to scan the documentation to understand how it is used. The documentation of ml5.js is exemplary, filled with examples and crystal clear. It gives the following example for the image classifier.
// Initialize the Image Classifier method with MobileNet
const classifier = ml5.imageClassifier('MobileNet', modelLoaded);

// When the model is loaded
function modelLoaded() {
  console.log('Model Loaded!');
}

// Make a prediction with a selected image
classifier.classify(
  document.getElementById('image'), (err, results) => {
    console.log(results);
  }
);
First, the image classifier is initialised from the ml5 object with the imageClassifier method. This method takes two arguments: the name of the pre-trained model to use (MobileNet) and a callback function that is run when the model is loaded. The classify method from the classifier is used with, again, two arguments: 1) the DOM element that contains the image (<img />) and 2) a callback function to do something with the results of the classification.
Now we can jump to the next section to think about how this can be implemented in Shiny.
12.2 Setup
In Shiny, a dropdown menu could be provided to choose from pre-selected images, and upon selection, the server renders the selected image. At the click of a button the model then runs and sends the results to the R server, which prints them in the UI (see Figure 12.1).
FIGURE 12.1: Simple shiny app, complex communication
This makes for what is probably a signature of Shiny: a considerable amount of bi-directional communication between the server and client as Shiny makes the most of the WebSocket. Some readers with more advanced knowledge in JavaScript will find ways to avoid the use of the server in places to do more in the client; either way works.
12.3 Dependencies
The ml5.js framework and all its components are bundled in a single JavaScript file.
We will create an html_dependency object using the htmlDependency function from the htmltools package. If confused, go back to the first part of the book on Shiny prerequisites, where it is explained in greater detail.
We have two options at our disposal either use the CDN (as shown in the previous code chunk) or download the file. We will start by making use of the CDN; later when we build a package for this functionality, we shall download it to provide users of the package a choice between using the local file or the CDN.
12.4 Static Files
Images will, of course, be necessary in order to test the image classifier. We are therefore going to download some from Wikipedia. The following code chunk creates a directory of assets, downloads images of birds and saves them to the aforementioned directory. For brevity, we limit ourselves to downloading two images, one of a flamingo and another of a lorikeet, but feel free to add more. Also, note that the pre-trained image classifier we are going to use in this example is not limited to birds.
# static files directory
dir.create("assets")
# flamingo
fl <- paste0(
"https://upload.wikimedia.org/wikipedia/",
"commons/thumb/7/72/American_flamingo",
"_%28Phoenicopterus_ruber%29.JPG/256px-",
"American_flamingo_%28Phoenicopterus_ruber%29.JPG"
)
# lorikeet
lo <- paste0(
"https://upload.wikimedia.org/wikipedia/",
"commons/thumb/c/c2/Rainbow_lorikeet.jpg/",
"256px-Rainbow_lorikeet.jpg"
)
# download
download.file(fl, destfile = "assets/flamingo.jpg")
download.file(lo, destfile = "assets/lorikeet.jpg")Finally we should also add a JavaScript file, which will eventually contain our custom functions to run the image classifier.
At this stage, one should obtain a directory resembling the tree below.
.
├── app.R
└── assets
├── classify.js
├── flamingo.JPG
└── lorikeet.jpgThese files will eventually need to be served (addResourcePath), so they are accessible by the Shiny UI.
12.5 Skeleton
At this stage, it’s probably good to build a skeleton of the application (Figure 12.2).
After loading the Shiny package, we use the addResourcePath function to serve the images so they can be made accessible by the Shiny UI to display. At this stage, the application itself only provides a dropdown to select one of the two images previously downloaded, and a button to trigger the classification, which currently does not do anything, we’ll delve into this next. Since we placed the classify.js JavaScript file in the assets directory we can also import it in the UI with a script tag; importantly this is done after the ml5.js dependency as it will depend on it. Another crucial thing that the app does is set the attribute id of the <img> to bird it is essential to have a convenient way to uniquely identify the image later on as ml5.js will need to read this image in order to classify it.
library(shiny)
# serve images
addResourcePath("assets", "assets")
# ml5js dependency
dependency_ml5 <- htmltools::htmlDependency(
  name = "ml5",
  version = "0.4.3",
  src = c(href = "https://unpkg.com/ml5@0.4.3/dist/"),
  script = "ml5.min.js"
)
ui <- fluidPage(
dependency_ml5,
tags$head(
tags$script(src = "assets/classify.js")
),
selectInput(
inputId = "selectedBird",
label = "bird",
choices = c("flamingo", "lorikeet")
),
actionButton("classify", "Classify"),
uiOutput("birdDisplay")
)
server <- function(input, output, session) {
output$birdDisplay <- renderUI({
path <- sprintf("assets/%s.jpg", input$selectedBird)
tags$img(src = path, id = "bird")
})
}
shinyApp(ui, server)
FIGURE 12.2: Shiny app skeleton
12.6 From R to JavaScript
What is now left to do is to program the classification. As a reminder, when the “classify” button is clicked, the classification must happen JavaScript-side using ml5.js; this implies that data must travel from R to JavaScript.
This will be carried in a similar fashion as in the previous chapter on alerts; the R server needs to send a message to the front end so it can trigger the classification using JavaScript.
We thus observe the button so that when clicked, a message is sent to the front end, via the WebSocket. Note that the sendCustomMessage method must take data, hence the empty list that is used as the second argument. That, of course, won’t do anything as we are yet to add a handler in JavaScript to handle this classify message that is sent.
Looking back at the documentation of ml5.js, we observe that before we can classify the image, the model should be loaded: we start by placing this code in the classify.js application.
The classifier is initialised from the imageClassifier method, which takes 1) the pre-trained model to use (or its name), and 2) a callback function. The callback function is run when the model is done loading. Though we don’t make use of it here the argument is not optional (omitting it will raise an error) so we pass a function that simply prints Model Loaded! to the console.
// Mandatory callback function
function modelLoaded() {
console.log('Model Loaded!');
}
// Initialize the Image Classifier method with MobileNet
const classifier = ml5.imageClassifier('MobileNet', modelLoaded);There is no need to repeatedly initialise the classifier every time a user hits the “classify” button: this should only be done once.
Finally, we can take care of the message handler. Remember the message sent from the R server bears the classify unique identifier. The handler function runs the classify method on the previously instantiated classifier object. This takes 1) the image to classify and 2) a callback function to handle the results of the classification. Here we genuinely get to why we gave the generated <img> of the selected bird and id: it helps us quickly select that image from JavaScript to use in the classifier with document.getElementById("bird").
// Mandatory callback function
function modelLoaded() {
console.log('Model Loaded!');
}
// Initialize the Image Classifier method with MobileNet
const classifier = ml5.imageClassifier('MobileNet', modelLoaded);
Shiny.addCustomMessageHandler('classify', function(data){
// Classify bird
classifier.classify(
document.getElementById("bird"), (err, results) => {
console.log(results)
}
);
});As mentioned at the start of the chapter, the results of the classification should be sent back to the R server, but for now, we shall content ourselves with logging it in the console.
Running the application and opening the console (Figure 12.3) already gives us encouraging results! The classifier gives “flamingo” the greatest confidence (albeit at 0.48).
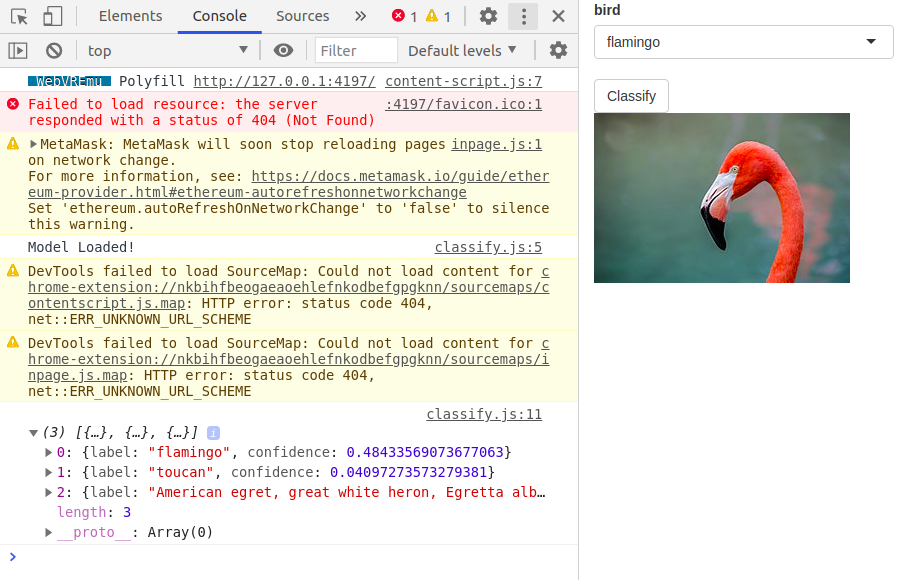
FIGURE 12.3: Results logged to the console
12.7 From JavaScript to R
The application thus classifies the images, but the results remain in the front end, and we would like to have those results returned to the R server so we can further process them and display them back to the user.
As in the previous chapter, this can be done with the setInputValue function, which, as a reminder, will do exactly as advertised: it will set an input with a given value in the R server. The code below will make it such that the results will be accessible in the R server with input$classification.
// Mandatory callback function
function modelLoaded() {
console.log('Model Loaded!');
}
// Initialize the Image Classifier method with MobileNet
const classifier = ml5.imageClassifier('MobileNet', modelLoaded);
Shiny.addCustomMessageHandler('classify', function(data){
// Classify bird
classifier.classify(
document.getElementById("bird"), (err, results) => {
Shiny.setInputValue("classification", results)
}
);
});Now that the results are sent back to the R server, we can use them to display it back in the application (Figure 12.4) so users of the application may know how the model performed. We shall eventually make this prettier, but for now, we’ll limit it to displaying the results in verbatimTextOutput.
library(shiny)
# serve images
addResourcePath("assets", "assets")
# ml5js dependency
dependency_ml5 <- htmltools::htmlDependency(
name = "ml5",
version = "0.4.3",
src = c(href = "https://unpkg.com/ml5@0.4.3/dist/"),
script = "ml5.min.js"
)
ui <- fluidPage(
dependency_ml5,
tags$head(tags$script(src = "assets/classify.js")),
selectInput(
inputId = "selectedBird",
label = "bird",
choices = c("flamingo", "lorikeet")
),
actionButton("classify", "Classify"),
uiOutput("birdDisplay"),
verbatimTextOutput("results") # display results
)
server <- function(input, output, session) {
output$birdDisplay <- renderUI({
path <- sprintf("assets/%s.jpg", input$selectedBird)
tags$img(src = path, id = "bird")
})
observeEvent(input$classify, {
  session$sendCustomMessage("classify", list())
})
# render results
output$results <- renderPrint({
print(input$classification)
})
}
shinyApp(ui, server)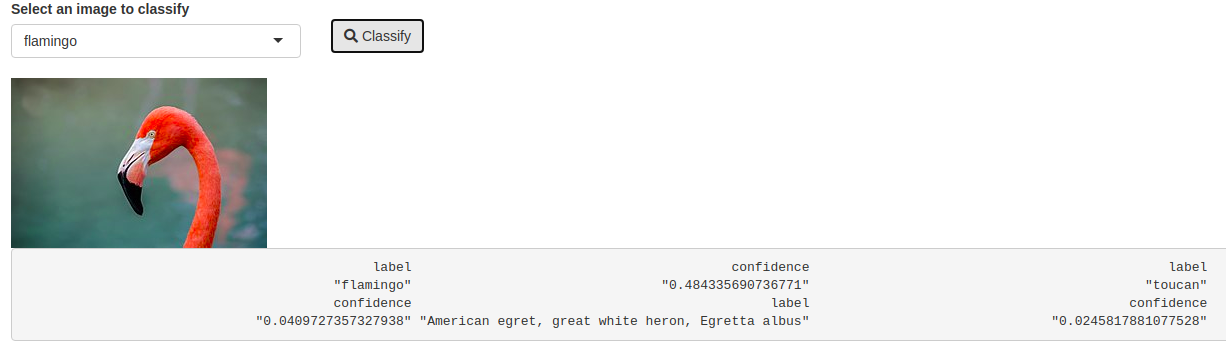
FIGURE 12.4: Classifier basic output
12.8 Input handler
In the previous section on sending data from R to JavaScript, we used a “message handler” in JavaScript to handle the data coming from the server. There is also the corollary, an “input handler” to preprocess the data coming from JavaScript before it is made accessible by the input. In R, this is a function that must accept three arguments: the data coming to JavaScript, a Shiny session, and the name of the input. Note that all of these arguments are mandatory if they are not used in the function we can use the three-dot construct instead.
Input handlers are most often used to reshape or change the type of the data coming in. To demonstrate how to use them, we will reshape the classification results sent to R as looking at the results of the classification in the R server one might notice a row-wise list, which can be transformed into a data.frame. The function below makes use of the purrr (Henry and Wickham 2020) package to loop over every result and transform them into data.frames and return a single data.frame.
Once this function created, it needs to be registered with Shiny using the registerInputHandler function, which takes two arguments. First, a unique identifier for the handler, second, the handler function. Attempt to give the handler a unique yet straightforward name (alphanumeric characters, underscores, and periods) to avoid clashes with other handlers.
Note that handlers can only be registered once; running the above twice will fail the second time, even if the handler function has changed. This is to ensure one does not accidentally overwrite handlers brought in by other packages. These can be overwritten by explicitly setting force to TRUE, but it is not advised.
It is not advised to overwrite the registered handler.
Once the handler function is created and registered with Shiny, what is left to do is tell Shiny which input should use that handler. This is done by adding the name of the handler, ml5.class, preceded by a colon (:ml5.class) as a suffix to the input name.
Shiny.addCustomMessageHandler('classify', function(data){
  // Classify bird
  classifier.classify(
    document.getElementById("bird"), (err, results) => {
      Shiny.setInputValue("classification:ml5.class", results);
    }
  );
});
Now that the results of input$classification is a data.frame we can display the results in a neat table instead, as shown in Figure 12.5.
library(shiny)

# serve images
addResourcePath("assets", "assets")

# create handler
handler <- function(data, ...){
  purrr::map_dfr(data, as.data.frame)
}

# register with shiny
shiny::registerInputHandler("ml5.class", handler)

# ml5js dependency
dependency_ml5 <- htmltools::htmlDependency(
  name = "ml5",
  version = "0.4.3",
  src = c(href = "https://unpkg.com/ml5@0.4.3/dist/"),
  script = "ml5.min.js"
)

ui <- fluidPage(
  dependency_ml5,
  tags$head(tags$script(src = "assets/classify.js")),
  selectInput(
    inputId = "selectedBird",
    label = "bird",
    choices = c("flamingo", "lorikeet")
  ),
  actionButton("classify", "Classify"),
  uiOutput("birdDisplay"),
  tableOutput("results")
)

server <- function(input, output, session) {

  output$birdDisplay <- renderUI({
    path <- sprintf("assets/%s.jpg", input$selectedBird)
    tags$img(src = path, id = "bird")
  })

  observeEvent(input$classify, {
    session$sendCustomMessage("classify", list())
  })

  output$results <- renderTable({
    input$classification
  })

}

shinyApp(ui, server)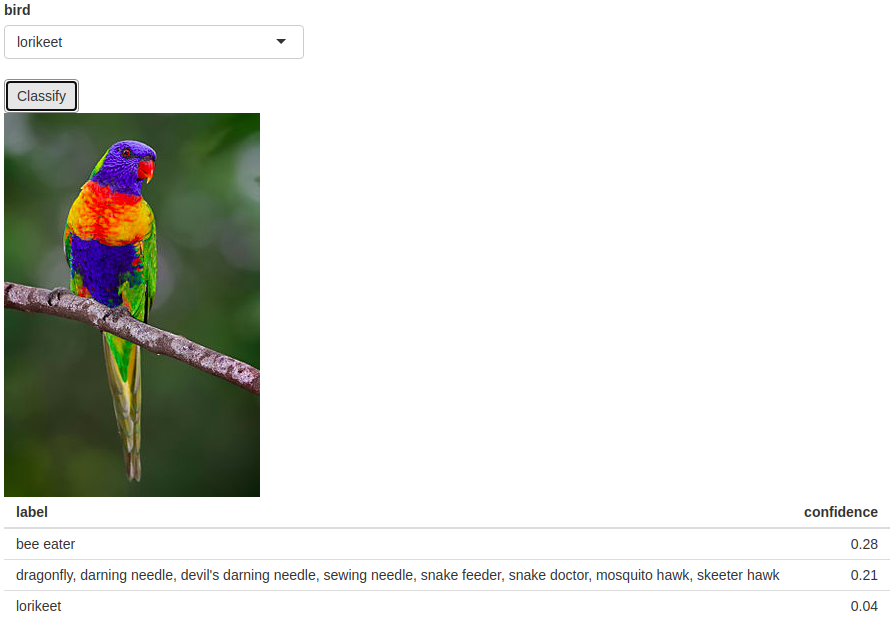
FIGURE 12.5: Classifier table output
12.9 As a Package
This chapter thus far built a nice application, but the code written is hardly portable; were one to make use of the image classifier from ml5.js in another application, everything would have to be rewritten or copy-pasted, which is hardly good practice and not remotely convenient. Instead this code should be packaged, so it is easily reusable and shareable. Moreover, this will benefit from all the other advantages that R packages bring to code such as documentation, reproducibility, and tests. This also forces the developer to think about the code differently. As we’ll discover it’s not as simple as wrapping individual functionalities from the app into functions.
Before we delve into building the package, let us think through what it should include. The application using ml5 gives some indication as to what the package will look like. Users of the package should be able to reproduce what is executed in the application, namely import dependencies (including the “message handler”), send data to the JavaScript front end to trigger the classification, and then obtain the results in the R server.
We start by creating a package called ml5.
12.9.1 Dependencies
In the application, the web-hosted dependencies (CDN) were used. There are two advantages to using CDNs: 1) it’s just convenient as one does not have to download them, 2) it’s fast—CDNs are distributed geographically to improve the speed at which they serve the dependencies and will therefore generally outperform the alternative, serving the files locally. This may raise questions when building a package though, as one generally wants these to be as modular, self-contained, and reproducible as possible, and none of these things go well with the idea of a remotely served dependency that is absolutely central to the package. The package should therefore provide both ways of importing dependencies: via the CDN or using locally-stored files. The former will be faster while the latter can be used as a fallback in the event there is an issue with the CDN or one does not have internet for instance.
We can download the dependency hosted on the CDN and place it in the inst directory of the package. We also create another JavaScript classify.js that will contain the custom JavaScript code (message handler, etc.) as was done for the application.
# create directory
dir.create("inst")

# download dependency
uri <- "https://unpkg.com/ml5@0.4.3/dist/ml5.min.js"
download.file(uri, destfile = "inst/ml5.min.js")

# create js file
file.create("inst/classify.js")
With the dependencies locally downloaded one can move on to create the R function that will be used to import the dependencies in the Shiny UI. The file classify.js should be imported via this function too. The function useMl5 creates two html_dependency objects, one for the custom code with the message handler and another for the ml5 dependency. Importantly at the end of the function these are returned in a tagList where order matters as these will be rendered in the order they are listed: first the ml5 dependency then the file containing our custom code.
# R/deps.R
#' @export
useMl5 <- function(cdn = TRUE) {

  # internal classify.js file
  pkg <- htmltools::htmlDependency(
    name = "ml5-pkg",
    version = "1.0.0",
    src = "",
    script = c(file = "classify.js"),
    package = "ml5"
  )

  # ml5 dependency
  if(cdn)
    ml5 <- htmltools::htmlDependency(
      name = "ml5",
      version = "0.4.3",
      src = c(href = "https://unpkg.com/ml5@0.4.3/dist/"),
      script = "ml5.min.js"
    )
  else
    ml5 <- htmltools::htmlDependency(
      name = "ml5",
      version = "0.4.3",
      src = "",
      script = c(file = "ml5.min.js"),
      package = "ml5"
    )

  htmltools::tagList(ml5, pkg)
}
12.9.2 Trigger classification
There will be a need for a function that sends a message to the front end to trigger the classification. In the application built previously the id of the image to classify was hard-coded this must be changed when building a package.
First, this will give users a much better interface where they may use whatever id suits them. Second, this will allow using the model to classify images that may be placed in different places and bear different ids.
12.9.3 JavaScript code
As a quick reminder, the JavaScript should initialise the model and provide a handler for the message ml5-classify that was defined in the previous section. Nothing needs to change with regard to the initialisation of the model. However, there are two things to adapt in the message handler. First, the id of the image to classify is now dynamically defined and passed from the R server; the code should therefore read document.getElementById(data) (where data is passed from the server) instead of document.getElementById('birds') as was previously hard-coded in the application.
Second, the application also had hardcoded the input id that was set with the results of the classification (input$classification). This will no longer work in a package: given the ability to classify multiple images the results of that classification should set different inputs so as not to overwrite one another. In the code below, we therefore create a dynamic input using the id: id + _classification. Note that one can concatenate string in JavaScript using +, while in R one would have to use the paste0 function.
Examples:
- Classify image with
id = 'birds'will return results toinput$birds_classification - Classify image with
id = 'things'will return results toinput$things_classification
// Initialize the Image Classifier method with MobileNet
const classifier = ml5.imageClassifier('MobileNet', modelLoaded);
// When the model is loaded
function modelLoaded() {
  console.log('Model Loaded!');
}

Shiny.addCustomMessageHandler('classify', function(data){
  // Classify bird
  classifier.classify(
    document.getElementById("bird"), (err, results) => {
      Shiny.setInputValue("classification:ml5.class", results);
    }
  );
});
12.9.4 Input handler
As mentioned the input handler that transforms the result sent from JavaScript to R into a data.frame can only be registered once. Therefore, placing the code that was written in an R file in the package will not work, or rather will work only once.
# R/handler.R
handler <- function(data, ...){
  purrr::map_dfr(data, as.data.frame)
}

# This will error
# register with shiny
shiny::registerInputHandler("ml5.class", handler)
When the library is loaded the first time it will work, but all subsequent attempts will fail.
library(ml5)

#> Loading ml5

library(ml5)

#> Loading ml5
#> Error in shiny::registerInputHandler("ml5.class", handler) :
#>   There is already an input handler for type: ml5.class
Packages can run functions when they are loaded or attached to an .onLoad function, which is called when the library is loaded in the global environment. The difference between loading and attaching a package can be subtle. In this case, it’s probably best to run the function when the package is loaded using .onLoad which the R Packages book describes as:
Loading will load code, data, and any DLLs; register S3 and S4 methods; and run the
.onLoad()function. After loading, the package is available in memory, but because it’s not in the search path, you won’t be able to access its components without using::. Confusingly,::will also load a package automatically if it isn’t already loaded. It’s rare to load a package explicitly, but you can do so withrequireNamespace()orloadNamespace().
This could be used here to ensure the handler is only registered once; calling library(packageName) twice does not load the package twice, the second time it runs the function observes that the package is already loaded and thus does not load it again. The .onLoad replacement function may accept libname and pkgname arguments, we simplify the function to using ... as we do not need those arguments.
12.9.5 Test
This is about all that is needed in order to build the package; one can then run devtools::document() to produce the man files and populate the namespace with the exported functions then install the package with devtools::install() in order to test it.
library(DT)
library(ml5)
library(shiny)

addResourcePath("assets", "assets")

ui <- fluidPage(
  useMl5(),
  selectInput(
    inputId = "selectedBird",
    label = "bird",
    choices = c("flamingo", "lorikeet")
  ),
  actionButton("classify", "Classify"),
  uiOutput("birdDisplay"),
  DTOutput("results")
)

server <- function(input, output, session) {

  output$birdDisplay <- renderUI({
    path <- sprintf("assets/%s.jpg", input$selectedBird)
    tags$img(src = path, id = "bird")
  })

  observeEvent(input$classify, {
    classify("bird")
  })

  output$results <- renderDT({
    datatable(input$bird_classification)
  })

}

shinyApp(ui, server)
References
Henry, Lionel, and Hadley Wickham. 2020. Purrr: Functional Programming Tools. https://CRAN.R-project.org/package=purrr.