Chapter 16 Cookies
In this chapter, we scout yet another excellent example of how JavaScript can enhance Shiny applications. We use an HTTP cookie, a small piece of data sent from an application and stored in the user’s web browser, to track users returning to a Shiny application.
The application will prompt users to input their name; this will be stored in a cookie so that on their next visit, they are welcomed to the app with a personalised message. Cookies are natively supported by web browsers and JavaScript, though we will use a library which greatly eases their handling: js-cookie.
16.1 Discover js-cookie
The library is at its core very straightforward; it exports a Cookie object from which one can access the set, get, and remove methods.
// set a cookie
Cookies.set('name', 'value')

// get cookies
Cookies.get();

// remove a cookie
Cookies.remove('name');
There is also the possibility to pass additional options when defining the cookie, such as how long it is valid for, but we won’t explore these here.
16.2 Setup Project
Then again, it starts with the creation of a directory where we’ll place a JavaScript file containing the message handlers; we won’t download the dependency and use the CDN instead but feel free to do differently.
We then lay down the skeleton of the application which features a text input to capture the name of the user, a button to save the cookie in their browsers, another to remove it and finally a dynamic output that will display the personalised message.
library(shiny)

addResourcePath("www", "www")

ui <- fluidPage(
  tags$head(
    tags$script(
      src = paste0(
        "https://cdn.jsdelivr.net/npm/js-cookie@rc/",
        "dist/js.cookie.min.js"
      )
    ),
    tags$script(src = "www/script.js")
  ),
  textInput("name_set", "What is your name?"),
  actionButton("save", "Save cookie"),
  actionButton("remove", "remove cookie"),
  uiOutput("name_get")
)

server <- function(input, output, session){

}

shinyApp(ui, server)
16.3 JavaScript Cookies
First, we define a JavaScript function that retrieves the cookies and sets the result as an input named cookies. The reason we do so is because we will have to execute this in multiple places; this will become clearer in just a second.
Then we define two message handlers, one that sets the cookie and another that removes it. Note that both of them run the getCookies function defined previously after they are done with their respective operations. The reason this is done is that we need the input to be updated with the new values after it is set and after it is removed. Otherwise setting or removing the cookie will leave the actual input value untouched and the result of the operation (setting or removing the cookie) will not be captured server-side.
// script.js
Shiny.addCustomMessageHandler('cookie-set', function(msg){
  Cookies.set(msg.name, msg.value);
  getCookies();
})

Shiny.addCustomMessageHandler('cookie-remove', function(msg){
  Cookies.remove(msg.name);
  getCookies();
})
One more thing needs to be implemented JavaScript-side. The point of using the cookie is that when users come back to the Shiny app, even days later, they are presented with the personalised welcome message, this implies that when they open the application, the input value is defined. Therefore, getCookies must at launch. One could be tempted to place it at the top of the JavaScript file so that it runs when it is imported but the issue there is that it will run too soon, it will run the Shiny input is not yet available and fail to set it. Consequently, we instead observe the shiny:connected event, which is fired when the initial connection to the server is established.
16.4 R Code
Then it’s a matter of completing the Shiny server which was left empty. We add an observeEvent on the save button where we check that a name has actually been typed in the text box before saving the cookie. There is another similar observer on the remove button. The renderUI expression checks that the cookie has been set and displays a message accordingly.
library(shiny)

addResourcePath("www", "www")

ui <- fluidPage(
  tags$head(
    tags$script(
      src = paste0(
        "https://cdn.jsdelivr.net/npm/js-cookie@rc/",
        "dist/js.cookie.min.js"
      )
    ),
    tags$script(src = "www/script.js")
  ),
  textInput("name_set", "What is your name?"),
  actionButton("save", "Save cookie"),
  actionButton("remove", "remove cookie"),
  uiOutput("name_get")
)

server <- function(input, output, session){

  # save
  observeEvent(input$save, {
    msg <- list(
      name = "name", value = input$name_set
    )

    if(input$name_set != "")
      session$sendCustomMessage("cookie-set", msg)
  })

  # delete
  observeEvent(input$remove, {
    msg <- list(name = "name")
    session$sendCustomMessage("cookie-remove", msg)
  })

  # output if cookie is specified
  output$name_get <- renderUI({
    if(!is.null(input$cookies$name))
      h3("Hello,", input$cookies$name)
    else
      h3("Who are you?")
  })

}

shinyApp(ui, server)
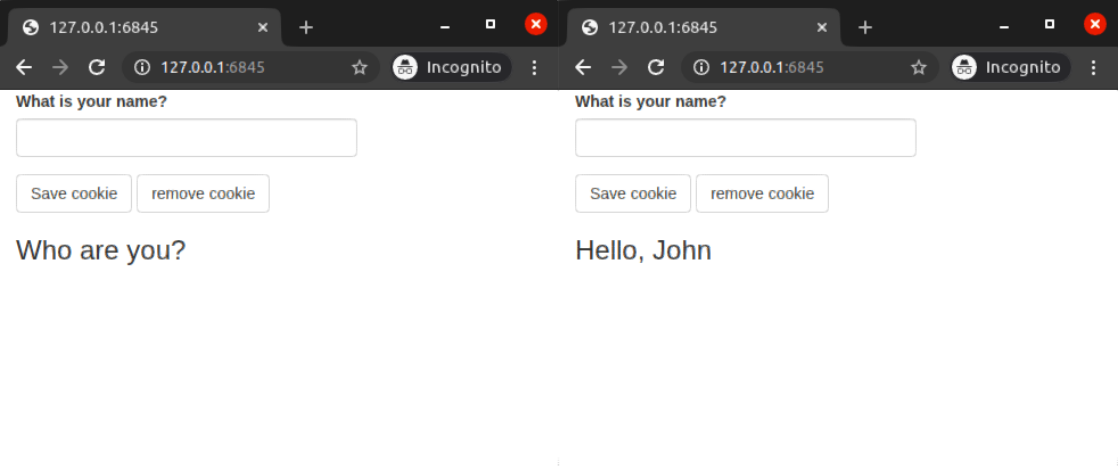
FIGURE 16.1: Shiny using cookies
Run the application and save your name. You can then refresh the application, and the welcome message will display your name. You can even kill the server entirely and re-run the app; the welcome message will still display as in Figure 16.1!
16.5 Exercises
In the following chapter, we cover the use of Shiny and bidirectional specifically for htmlwidgets. Before moving on it is a good idea to attempt to replicate the examples that were created in this part of the book. Below are some interesting JavaScript libraries that are not yet integrated with Shiny (as packages). These would be great additions to the Shiny ecosystem and are specifically selected because they are approachable.
- micromodal.js - tiny, dependency-free javascript library for creating accessible modals
- hotkeys - capture keyboard inputs
- handtrack.js - realtime hand detection
- annyang - speech Recognition library