Chapter 13 Tips and Tricks
While previous chapters on working with Shiny made use of external libraries and built packages that brought new functionalities previously not available in Shiny, one does not have to go to this length to take advantage of the learnings contained in those pages. Moreover, there are a few exciting things that have not yet been explored.
13.1 Shiny Events
There is a wee bit of documentation tucked away on the shiny website that contains a useful list of events that Shiny fires to notify the developer of interesting things that happen in the application. This includes events that are fired when outputs are being recalculated, when Shiny connects, when an element become visible, and more. To demonstrate how to use those events and how handy they can be, we will create a notification which appears to indicate that the server is busy running computations. This could be as fancy as ever, but for simplicity’s sake, we limit the demonstration to showing and hiding a gif.
First, we create the directories and necessary files, and to indicate the server is busy. We’ll be using a gif that is rather well-known in the R community. Note that we will be using some CSS, hence the style.css file.
dir.create("www")
file.create("www/script.js")
file.create("www/style.css")

# gif
gif <- paste0(
  "https://github.com/JohnCoene/javascript-for-r/",
  "raw/master/code/events/www/typing.gif"
)
download.file(gif, "www/typing.gif")
Then we create an application that draws and redraws a plot at the click of a button. Note that we give the gif an id as we will need to be able to retrieve this element JavaScript-side (to dynamically show and hide it), and an id makes for an ideal selector.
# app.R
library(shiny)

shiny::addResourcePath("www", "www")

ui <- fluidPage(
  # import dependencies
  tags$head(
    tags$link(href = "www/style.css", rel = "stylesheet"),
    tags$script(src = "www/script.js")
  ),
  # gif indicator
  tags$img(src = "www/typing.gif", id = "loading")
  plotOutput("plot"),
  actionButton("render", "render")
)

server <- function(input, output, session) {
  output$plot <- renderPlot({
    input$render # redraw on click

    # simulate time consuming computations
    Sys.sleep(2)
    plot(cars)
  })
}

shinyApp(ui, server)
The gif should only be visible when the server is busy, unlike now. Whether it is visible will be controlled in JavaScript, so this should be initialised as hidden using CSS. The following code hides the gif with visibility: hidden, and repositions it, floating on top of the rest of the content in the top right of the page, the z-index ensures the gif appears on top of other elements.
/* style.css */
#loading{
  top: 20px;
  right: 20px;
  height: 200px;
  z-index: 9999;
  position: absolute;
  visibility: hidden;
}
We can then use the Shiny events to dynamically show and hide the gif when the server is busy. Below we observe the event shiny:busy on the entire page (document) when the event is triggered the gif is retrieved using its id and then made visible by changing its CSS visibility property to visible.
// script.js
$(document).on('shiny:busy', function(event) {
  // retrieve the gif
  var title = document.getElementById("loading");

  // make it visible
  title.style.visibility = "visible";
});
We then need to hide the gif when the server goes from busy to idle, using the shiny:idle event we can change the visibility of the gif back to hidden.
// script.js
$(document).on('shiny:busy', function(event) {
  // retrieve the gif
  var gif = document.getElementById("loading");

  // make gif visible
  gif.style.visibility = "visible";
});

$(document).on('shiny:idle', function(event) {
  var gif = document.getElementById("loading");

  // hide gif
  gif.style.visibility = "hidden";
});
The application will then display the gif when the server is busy running computations as in Figure 13.1.
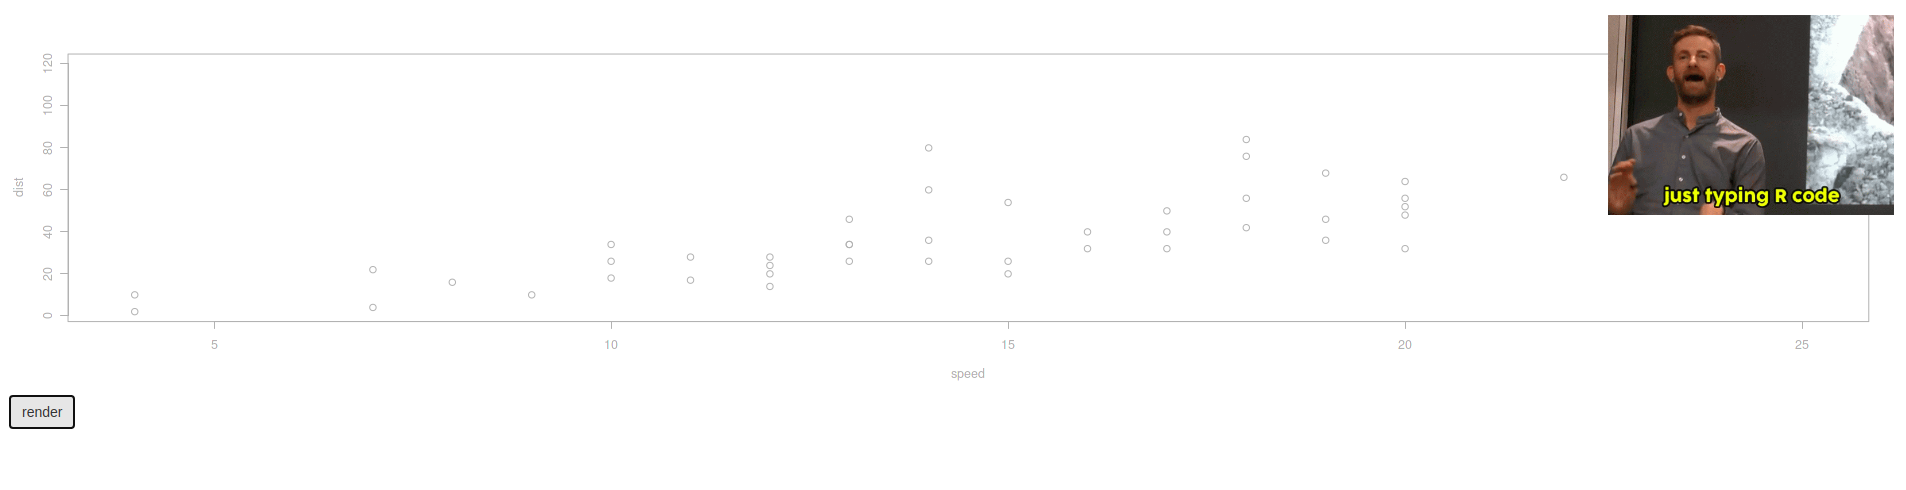
FIGURE 13.1: Shiny with a busy indicator
13.2 Table Buttons
For instance, using what was learned previously, one can place buttons inside a Shiny table and observe server-side, which is clicked. With a basic application that only includes a table to which we ultimately want to add a column containing a button on each row. Here we achieve this by having each button set a different value (e.g., an id) to an input using shiny.setInputValue, but one could very well create different input names for each button.
library(DT)
library(shiny)

ui <- fluidPage(
  DTOutput("table")
)

server <- function(input, output) {

  output$table <- renderDT({
    datatable(
      mtcars,
      escape = FALSE,
      selection = "none",
      rownames = FALSE,
      style = "bootstrap"
    )
  })

}

shinyApp(ui, server)
Note that in the above we pass some parameters to datatable not all are necessary at the exception of escape, which is set to FALSE as we will ultimately place HTML code the table which should appear rendered rather than show said code as a string.
We start by creating the on-click functions as R character strings for each row of the mtcars dataset. This is the function that will be triggered when buttons are clicked. This should look familiar we use Shiny.setInputValue to define an input named click, which is set to a different value for every row of the table.
library(DT)
library(shiny)

ui <- fluidPage(
  DTOutput("table")
)

server <- function(input, output) {

  output$table <- renderDT({
    # on click function
    onclick <- sprintf(
      "Shiny.setInputValue('click', '%s')",
      rownames(mtcars)
    )

    datatable(
      mtcars,
      escape = FALSE,
      selection = "none",
      rownames = FALSE,
      style = "bootstrap"
    )
  })

}

shinyApp(ui, server)
Next, we create the buttons for each row and set the JavaScript functions previously created as the onClick attributes. The JavaScript code passed to the onClick attribute will be executed every time the button is clicked.
library(DT)
library(shiny)

ui <- fluidPage(
  DTOutput("table")
)

server <- function(input, output) {

  output$table <- renderDT({
    # on click function
    onclick <- sprintf(
      "Shiny.setInputValue('click', '%s')",
      rownames(mtcars)
    )

    # button with onClick function
    button <- sprintf(
      "<a class='btn btn-primary' onClick='%s'>Click me</a>",
      onclick
    )

    mtcars$button <- button
    datatable(
      mtcars,
      escape = FALSE,
      selection = "none",
      rownames = FALSE,
      style = "bootstrap"
    )
  })

}

shinyApp(ui, server)
We can then observe the click input and, to demonstrate, render it’s value in the UI, see Figure 13.2 below.
library(DT)
library(shiny)

ui <- fluidPage(
  br(),
  DTOutput("table"),
  strong("Clicked Model:"),
  verbatimTextOutput("model")
)

server <- function(input, output) {

  output$table <- renderDT({
    # on click function
    onclick <- sprintf(
      "Shiny.setInputValue('click', '%s')",
      rownames(mtcars)
    )

    # button with onClick function
    button <- sprintf(
      "<a class='btn btn-primary' onClick='%s'>Click me</a>",
      onclick
    )

    # add button to data.frame
    mtcars$button <- button

    datatable(
      mtcars,
      escape = FALSE,
      selection = "none",
      rownames = FALSE,
      style = "bootstrap"
    )
  })

  output$model <- renderPrint({
    print(input$click)
  })
}

shinyApp(ui, server)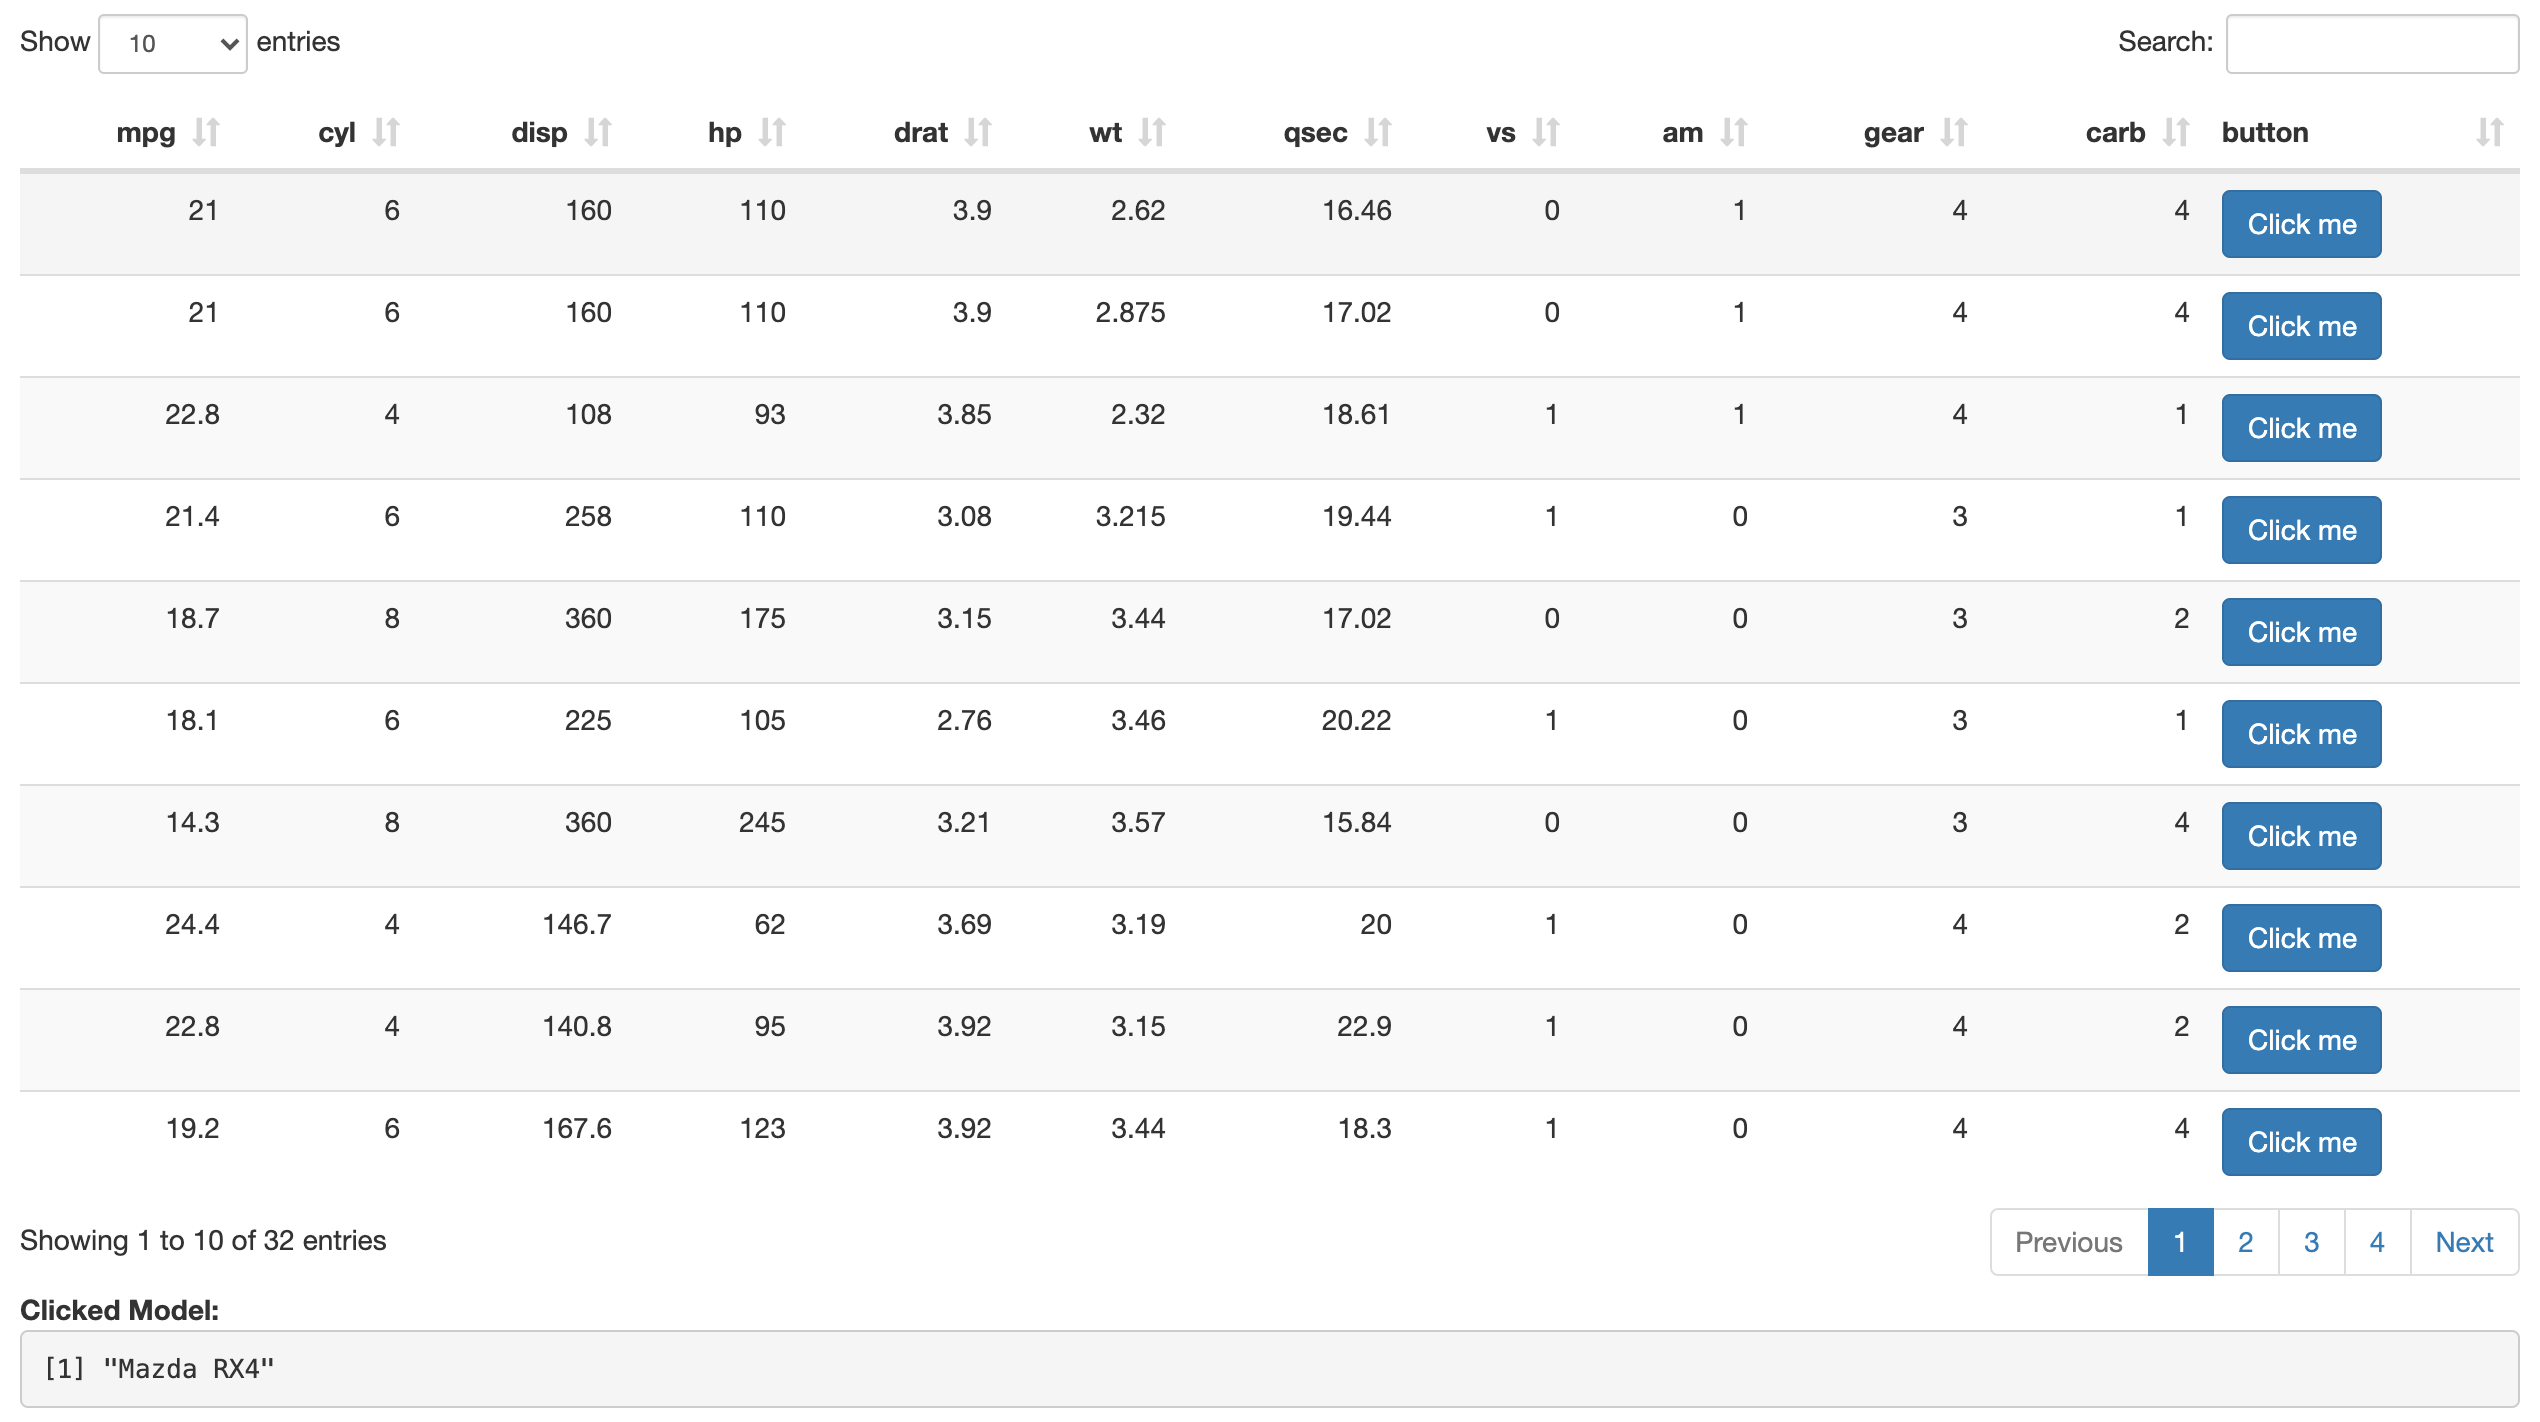
FIGURE 13.2: DT with custom inputs
13.3 jQuery
The Shiny framework itself makes use of and thus imports the jQuery JavaScript library, a library that provides a convenient API to make many things easier, including animations.
As an example, we could use jQuery’s show, hide, or toggle functions to show or hide an HTML element at the press of a button.
Because jQuery is already imported, there is no need to do so, on the contrary, importing it again will impact load time and might clash with the pre-existing version. Below we create a Shiny application containing a message handler to toggle (show or hide element depending on its state) at the click of a button.
library(shiny)

ui <- fluidPage(
  tags$head(
    tags$script(
      "Shiny.addCustomMessageHandler(
        'jquery-toggle', function(id){
          $('#' + id).toggle(); // id
      });"
    )
  ),
  actionButton("toggle", "Toggle text"),
  h1("This text is shown!", id = "text")
)

server <- function(input, output, session){

  observeEvent(input$toggle, {
    session$sendCustomMessage('jquery-toggle', "text")
  })

}

shinyApp(ui, server)
Note that jQuery takes a selector so one could very well use a class to hide and show multiple elements (with said class) at once.
library(shiny)

ui <- fluidPage(
  tags$head(
    tags$script(
      "Shiny.addCustomMessageHandler(
        'jquery-toggle', function(selector){
          $(selector).toggle();
      });"
    )
  ),
  actionButton("toggle", "Toggle text"),
  h1("This text is shown!", class = "to-toggle"),
  actionButton(
    "btn", "Another visible button", class = "to-toggle"
  )
)

server <- function(input, output, session){

  observeEvent(input$toggle, {
    session$sendCustomMessage('jquery-toggle', ".to-toggle")
  })

}

shinyApp(ui, server)
This is something where, again, R is leveraged in order to make it easier on the Shiny developer, but it must be said that it suffers from some inefficiency: the message travels from the browser (button click) to the R server, where it is sent back to the browser and triggers toggle. It could indeed very well be rewritten in JavaScript entirely. This is, however, outside the scope of this book.